> ## Documentation Index
> Fetch the complete documentation index at: https://help.propops.app/llms.txt
> Use this file to discover all available pages before exploring further.
# Your First Job
> Step-by-step walkthrough for creating your first maintenance job in PropOps Web — from raising a report through to completion and sign-off.
This guide walks you through the complete lifecycle of a job — from creation, through contractor assignment and completion, to financial close-out.
Before you begin, make sure your administrator has configured at least one **branch**, **job type**, and **priority level** under **Settings → Job Tags**.
***
## 1. Create the job
Go to **Jobs** in the sidebar and select **Create Job**.
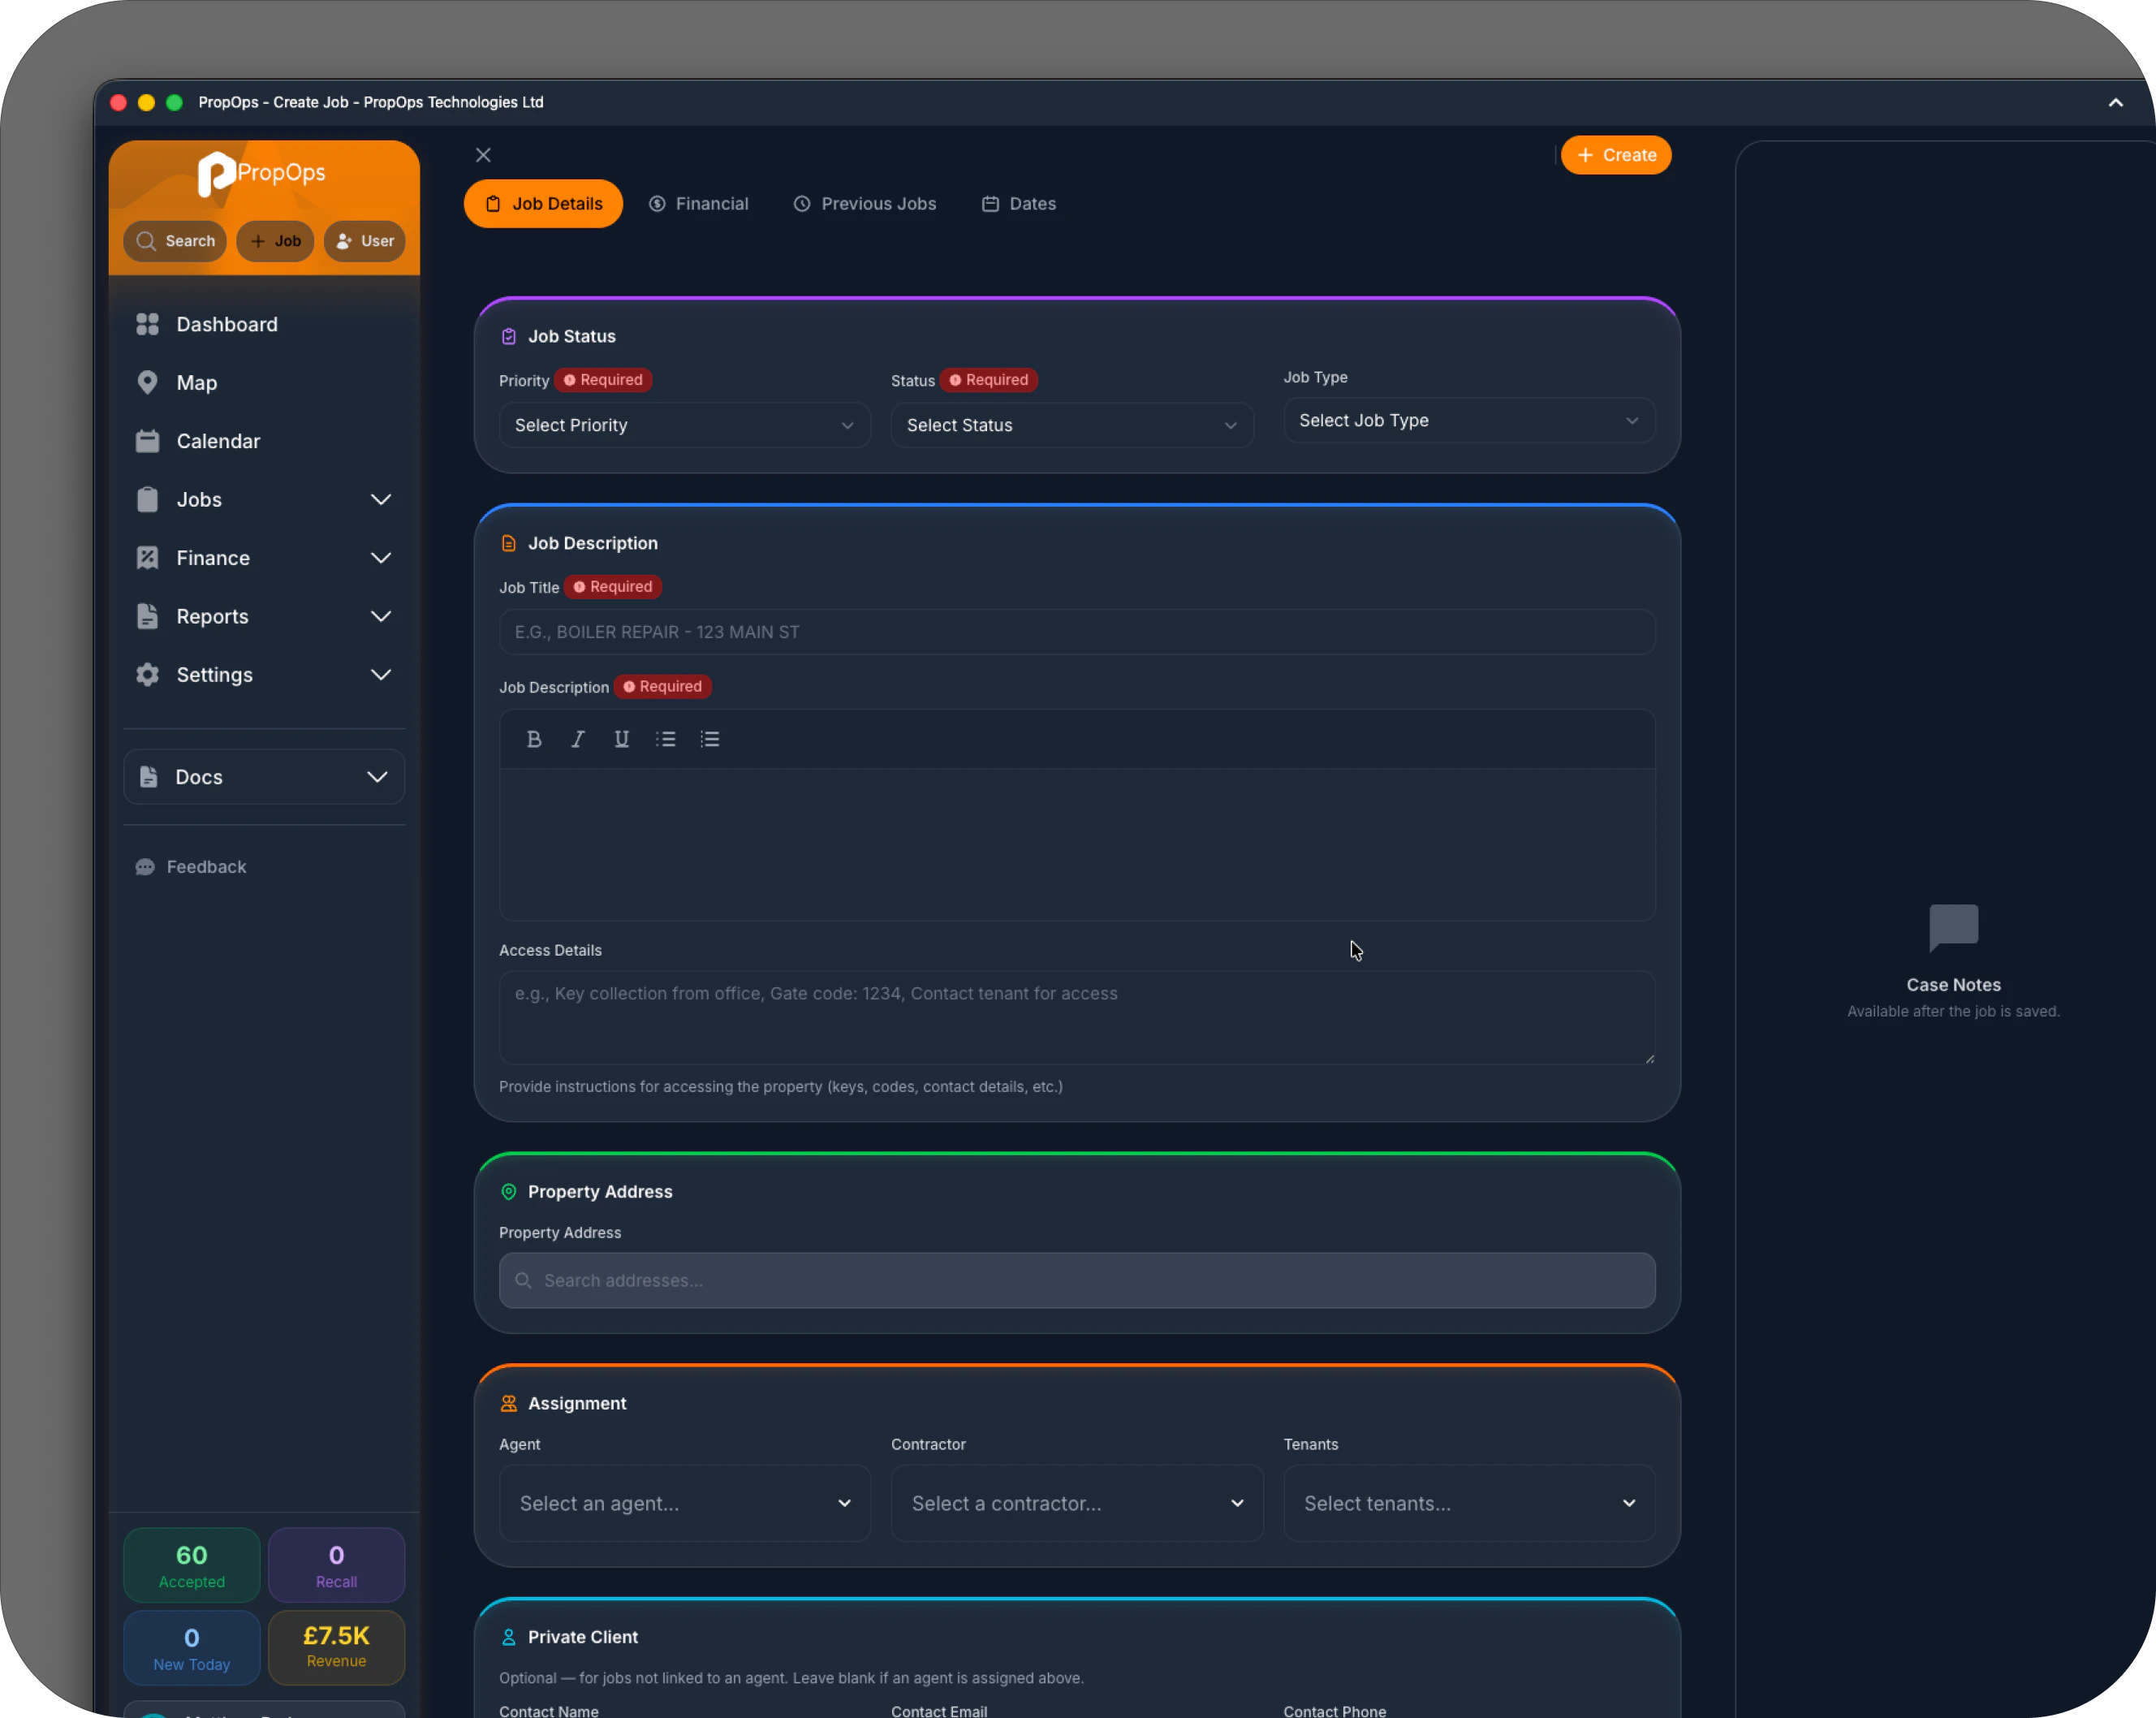
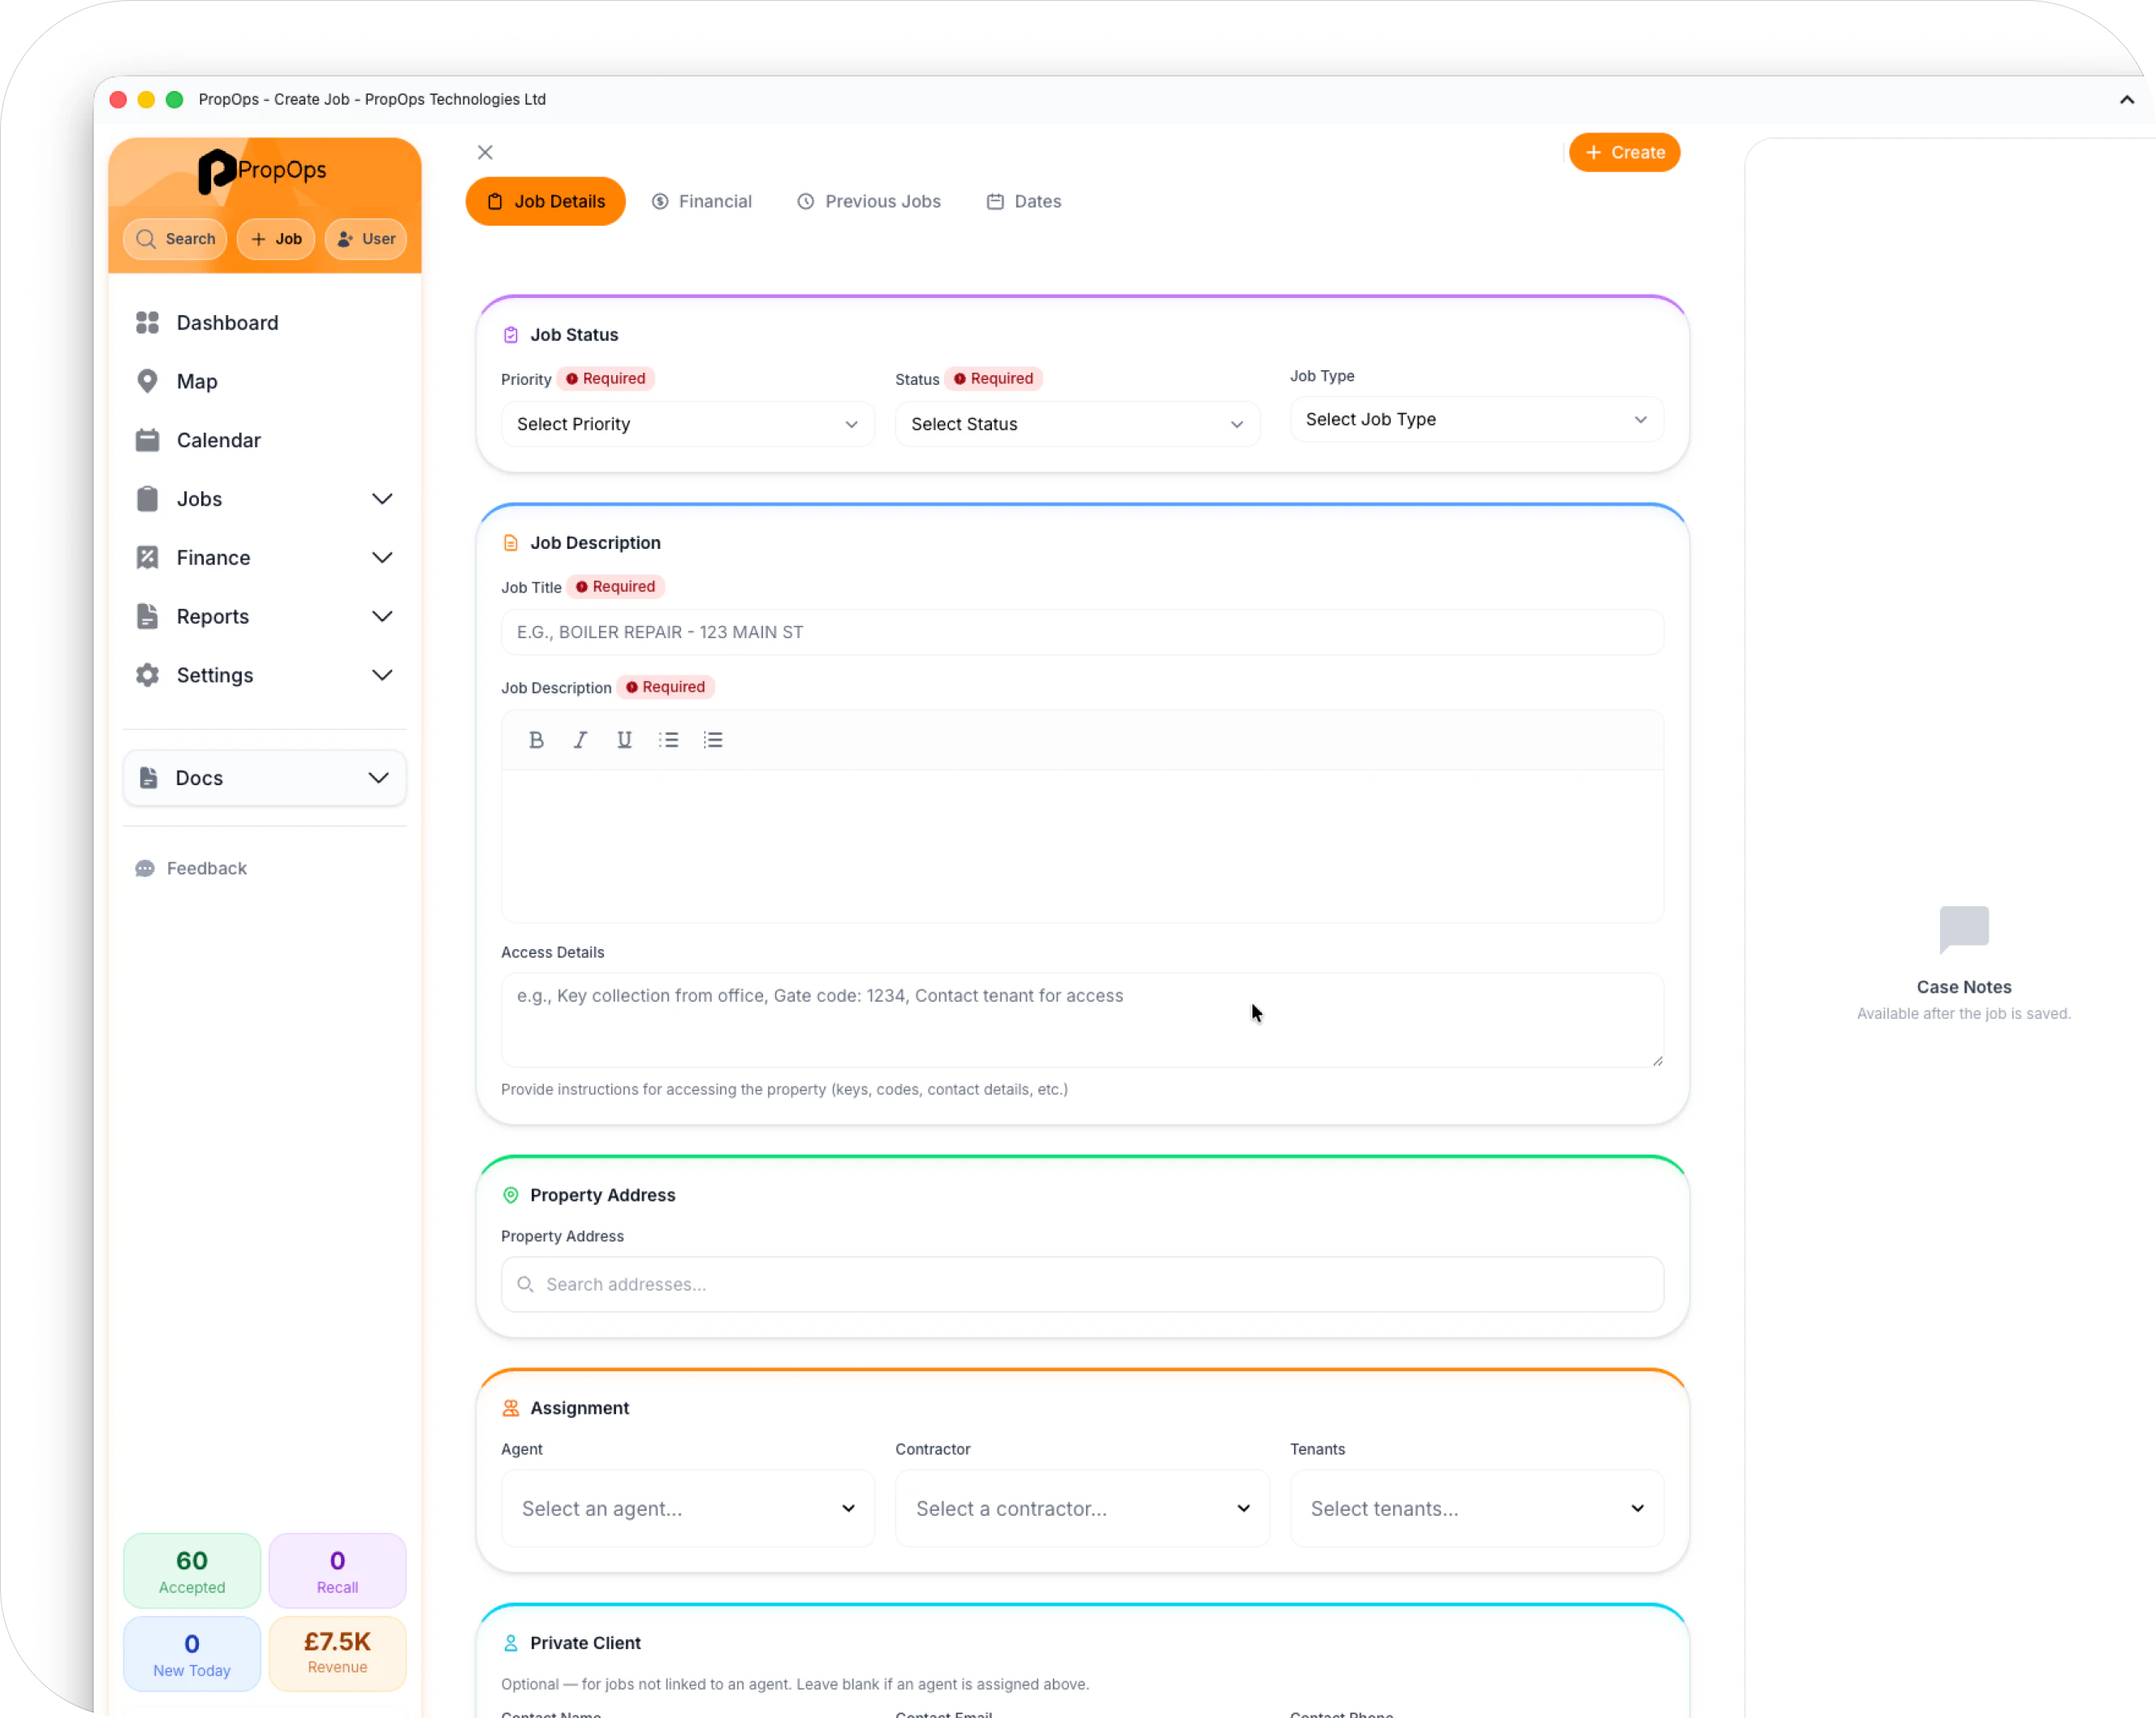 Set the Priority, Status, and Job Type. Enter a clear Job Title — something like "SINK REPAIR" — and write a full description in the rich-text editor.
Addresses are created independently from jobs, if the address hasn't been added to the system before you will be presented with a add new address form automatically
Search for the tenant in the **Tenants** field and select them. If the tenant doesn't exist yet, you can create a new tenant from within the job and assign it to the address so they are automatically selected on future jobs or previous jobs as the current tenants.
Select **Create**. PropOps assigns a unique job reference and sends notifications to the relevant parties.
***
## 2. Assign a contractor
Open **Contractors → Coverage Map** from the sidebar. Enter the property postcode in the search bar. The map shows which contractors cover that area, with isochrone overlays showing realistic travel coverage.
Select a contractor on the map to see their trades, certifications, and current workload. Make sure they hold valid certifications for the job type.
Go back to your job record and edit it. In the **Contractor** field, search for and select the contractor you chose. Save the job — the contractor receives a notification with the job details.
PropOps Web can suggest the best contractor automatically based on trade and location. Look for the suggestion in the contractor assignment field.
***
## 3. Track progress
Once the contractor is assigned, the job moves through the lifecycle:
| What happens | What you see in PropOps |
| ---------------------------- | -------------------------------------------- |
| Contractor accepts the job | Status changes to **Assigned** |
| Work begins on site | Status changes to **In Progress** |
| Contractor adds updates | New case notes appear in the job timeline |
| Photos or documents uploaded | Attachment count increases in the job header |
You can add your own case notes at any point — type in the Case Notes panel and attach photos or documents as needed.
### Monitor the SLA
The SLA indicator on the job card shows how much time remains before the target deadline. If the job approaches its deadline, PropOps sends automated warnings. A missed deadline is recorded as an **SLA breach** in the audit log.
***
## 4. Complete the job
The contractor marks the job as complete and adds a completion note with any relevant details or photos.
Open the job and review the case notes, photos, and completion details. If you're satisfied, move the status to **Closed**.
If the work isn't right, select **Actions → Recall Job** to reopen it. Enter the reason — the contractor is notified and the job appears in **Jobs → Recalls**.
***
## 5. Close out financially
Go to the **Financial** tab on the job. Enter the invoice number, agent price (ex. VAT), contractor total, and any budget figures. VAT is calculated automatically.
As payments come in, mark each one in the Financial tab — client payment received, contractor payment sent, commissions paid. The payment status updates automatically.
When all payments are recorded, the job shows **Payment Complete**. It's now fully closed.
***
## What's next?
Set up contractor profiles, certifications, and coverage areas.
Learn about invoicing, payment tracking, and reconciliation.
Set the Priority, Status, and Job Type. Enter a clear Job Title — something like "SINK REPAIR" — and write a full description in the rich-text editor.
Addresses are created independently from jobs, if the address hasn't been added to the system before you will be presented with a add new address form automatically
Search for the tenant in the **Tenants** field and select them. If the tenant doesn't exist yet, you can create a new tenant from within the job and assign it to the address so they are automatically selected on future jobs or previous jobs as the current tenants.
Select **Create**. PropOps assigns a unique job reference and sends notifications to the relevant parties.
***
## 2. Assign a contractor
Open **Contractors → Coverage Map** from the sidebar. Enter the property postcode in the search bar. The map shows which contractors cover that area, with isochrone overlays showing realistic travel coverage.
Select a contractor on the map to see their trades, certifications, and current workload. Make sure they hold valid certifications for the job type.
Go back to your job record and edit it. In the **Contractor** field, search for and select the contractor you chose. Save the job — the contractor receives a notification with the job details.
PropOps Web can suggest the best contractor automatically based on trade and location. Look for the suggestion in the contractor assignment field.
***
## 3. Track progress
Once the contractor is assigned, the job moves through the lifecycle:
| What happens | What you see in PropOps |
| ---------------------------- | -------------------------------------------- |
| Contractor accepts the job | Status changes to **Assigned** |
| Work begins on site | Status changes to **In Progress** |
| Contractor adds updates | New case notes appear in the job timeline |
| Photos or documents uploaded | Attachment count increases in the job header |
You can add your own case notes at any point — type in the Case Notes panel and attach photos or documents as needed.
### Monitor the SLA
The SLA indicator on the job card shows how much time remains before the target deadline. If the job approaches its deadline, PropOps sends automated warnings. A missed deadline is recorded as an **SLA breach** in the audit log.
***
## 4. Complete the job
The contractor marks the job as complete and adds a completion note with any relevant details or photos.
Open the job and review the case notes, photos, and completion details. If you're satisfied, move the status to **Closed**.
If the work isn't right, select **Actions → Recall Job** to reopen it. Enter the reason — the contractor is notified and the job appears in **Jobs → Recalls**.
***
## 5. Close out financially
Go to the **Financial** tab on the job. Enter the invoice number, agent price (ex. VAT), contractor total, and any budget figures. VAT is calculated automatically.
As payments come in, mark each one in the Financial tab — client payment received, contractor payment sent, commissions paid. The payment status updates automatically.
When all payments are recorded, the job shows **Payment Complete**. It's now fully closed.
***
## What's next?
Set up contractor profiles, certifications, and coverage areas.
Learn about invoicing, payment tracking, and reconciliation.